Hello world
시작하는 질문
- 내가 C 프로그램을 처음 배울 때 짰던 프로그램이 "Hello World !" 였었는데, AURIX에서는 이런 프로그램을 짤 필요가 없나?
- 어 가만히 있어봐라. 프로그램을 디버깅 할 때 필요한 값을
printf()해서 command 창으로 출력해서 봤었는데.... printf 를 사용할 수 없으면 어떻게 되는 거지? 변수값을 어떻게 확인하면서 디버깅하지?
"Hello World!" 너무나도 유명한 프로그램이지요? C 프로그램을 배우는 대부분의 사람들이 이 프로그램을 다 짜보았을 것으로 생각됩니다. AURIX 에는 모니터도 키보드도 달려 있지 않아서 C 프로그램에서 콘솔이라 부르는 입출력이 없습니다. 대신 직렬 통신 기능을 가지고 있습니다. 이 직렬 통신으로 우리가 사용하는 컴퓨터와 통신을 할 수 있고 우리는 컴퓨터에서 "Tera Term", "Putty" 와 같은 터미날 프로그램을 실행하여서 콘솔을 대신할 수 있습니다.
통신 자체의 목적으로 보면 Ethernet, USB 등과 같이 훨씬 더 고속의 안정된 프로토콜이 많이 있습니다. 그러나 모든 마이크로컨트롤러들이 내장하고 있는 가장 기본적인 직렬통신 방식이고, 이 예제를 통해서 배우는 것과 같이 터미널 프로그램을 쉽게 붙일 수 있어서 아직까지도 많이 사용되는 통신 방식 입니다. 개인적으로는 Twinkle twinkle little star와 함께 마이크로컨트롤러를 프로그래밍 하면서 기본적으로 구성하는 프로그램 입니다
직렬통신을 통해서 접근할 수 없는 상황에서는 디버거를 사용해서 변수값을 확인하고 변경해 볼 수 있습니다. 물론 printf() 를 사용하는 것과는 용도가 다르지만, 출력을 하는 이유가 디버깅을 위한 변수확인이라면 디버거를 통해서 훨씬 효율적으로 실행할 수 있습니다. 참고로, 우리가 사용하는 _MyBaseFramework_TC23A를 포함한 모든 프로젝트에는 개발의 편의를 위하여 printf() 를 했을 경우 디버거의 Simulated IO 창으로 그 결과를 출력하도록 구성해 놓았습니다.
Objectives
- Asclin를 이용한 직렬통신 구현
- 외부 터미널을 통한 입력과 출력의 확인
References
- TC23x TC27x Family User's Manual v1.1 - 19 ASCLIN
- iLLD_1_0_1_8_0_TC2xx_Drivers_And_Demos_Release - Modules/iLLD/ASCLIN
[Example Code]
- MyIlldModule_TC23A - AsclinAsc
- MyIlldModule_TC27D - AsclinAsc
Example Description
-
터미널을 통해 다음의 기능이 동작하는지 확인한다.
- 프로그램 시작 시 '12345'라는 문자열을 출력
- 메세지를 5개 입력받을 때마다 입력받은 데이터를 출력
-
디버거의 Simulated IO를 통해 다음 기능이 동작하는지 확인한다.
- 일치 여부에 따라 error 또는 성공 메세지를 출력
AURIX -related
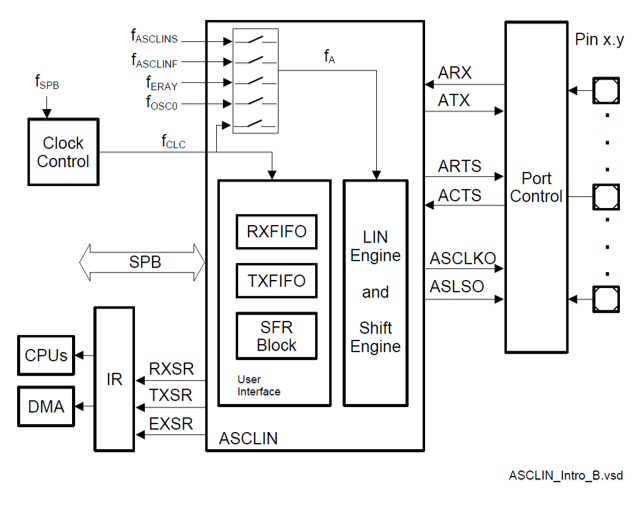
Asclin ( Asynchronous/Synchronous Interface )
- 빠르고(fast) 유연한(flexible) 직렬(serial) 통신 인터페이스 구축을 위한 모듈로
- 어떠한 signal들을,
- 어떠한 protocol을 통해서,
- 어떠한 sequence로 데이터를 처리할지를 결정해 준다.
- AURIX의 Module은 구성은 다음과 같음
Signals
- Asclin의 signal 들은 다음과 같이 data 통신에 관한 signal,
- Receive data input, ARX
- Transmit data output, ATX
- Request to send handshake output, ARTS
- Clear to send handshake input, ACTS
- Module에 관한 signal이 존재
- Slave select signal output, ASLSO
- Serial clock output, ASCLK
Protocols
- 사람과 다르게 기계들의 통신은 명확하게 미리 정한 약속에 따라 진행이 되며,
- 이 약속을 통신 Protocol 이라고 한다.
- Asclin은 다음과 같은 protocol들을 제공
- ASC: 일반적인 Asclin 통신 프로토콜 (본 예제에서 사용)
- LIN: Local interconnect network, 차량에서 느린 속도로 data를 전송할 때 사용
- SPI: Serial Peripheral Interface, 동기화된 병렬통신을 이용할 때 사용
Sequences
- 직렬통신은 한 번에 data를 한 bit씩 밖에 전송을 못 하기 때문에,
- 전송하고자 하는 data를 순차적으로 관리해 주는 것이 필요하며,
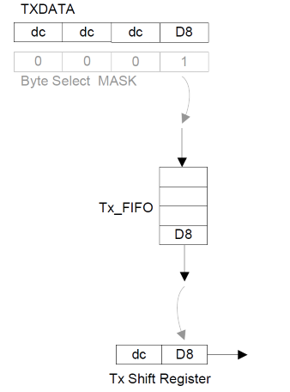
- Asclin은 먼저 들어온 data를 먼저 내보내는 FIFO 방식을 사용한다. (First-In-First-Out)
- 아래 그림은 TX FIFO의 처리 구조
Communication process
-
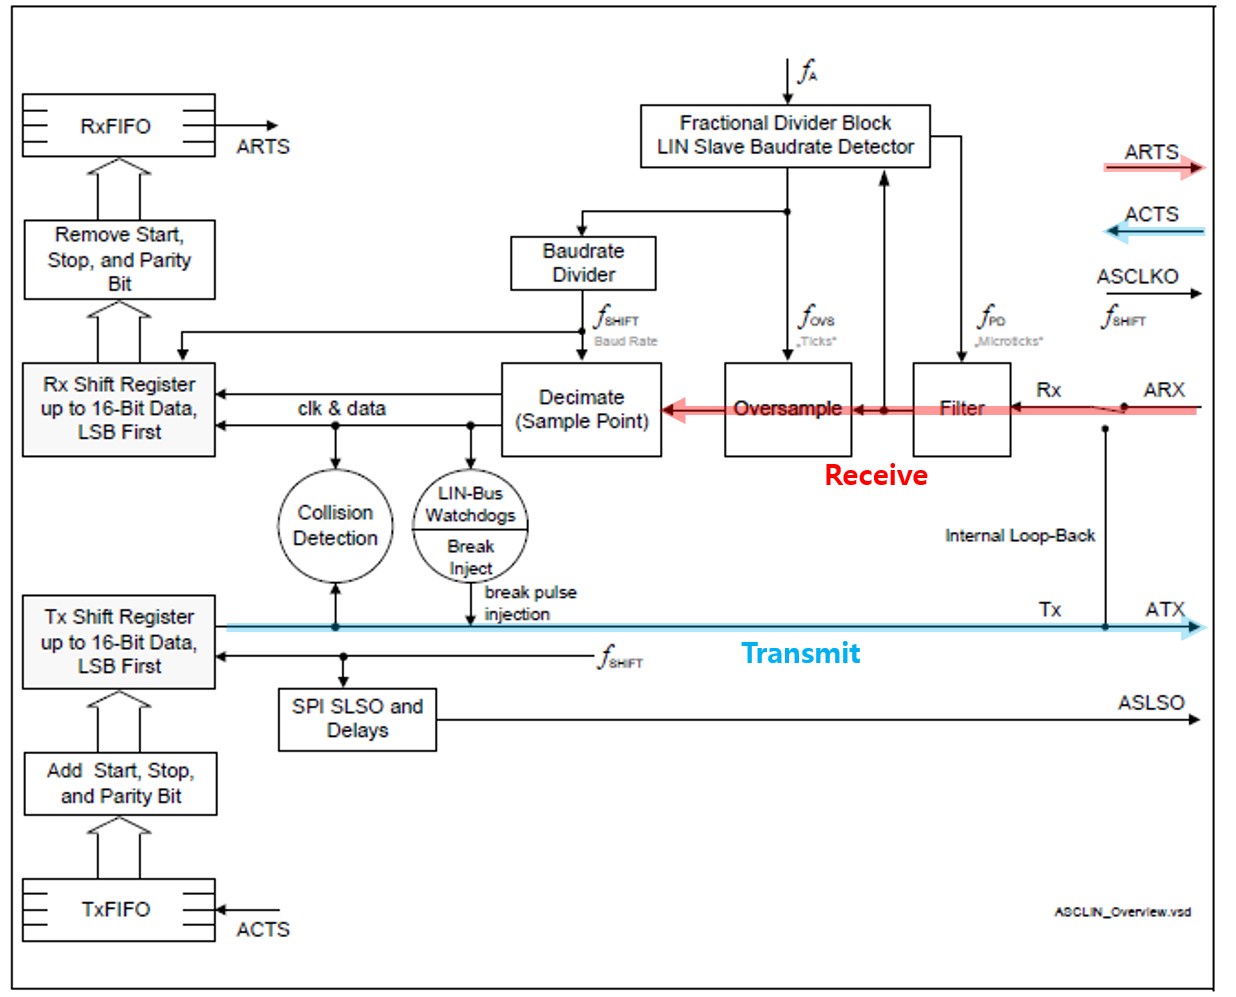
Data를 수신할 때
- 입력 데이터가 들어옴 (ARX)
- Robust한 통신을 위한 필터링 (Filter, Oversampling, Decimate)
- FIFO기반 unpackaging (RxFIFO)
- handshake 요청에 답변 (ARTS)
-
Data를 송신할 때
- 송신하려는 데이터가 들어옴 (ATX)
- FIFO기반 packaging (TxFIFO)
- handshake 응답을 기다림 (ACTS)
-
Handshake
- Data를 송수신할때 통신이 가능한지 상태를 주고받아 원활한 통신을 가능하게 한다.
- RTS는 자신의 수신버퍼 상태를 알려주는 신호이며,
- CTS는 상대의 수신버퍼의 상태를 받았다는 신호.
- 이런 신호들을 주고 받는 행위을 handshake라고 한다.
- 받는쪽에서 받을 준비가 됬음을 RTS를 통해서 알리고,
- 송신쪽에서 그 신호를 받았음을 CTS를 통해 응답한다.
-
Interrupt
- 비동기 직렬통신이기 때문에 언제 data 전송이 일어날지 알 수 없음
- 때문에 인터럽트를 이용해 비동기 통신에 대응한다.
- 인터럽트를 발생시킨 후 data 처리을 위한 작업을 진행
iLLD - related
Module Configuration
- Asclin의 모듈 초기화
- 사용할 protocol(AsclinAsc; uart)을 정하고 (TC23A: module 0, TC27D: module 3),
- 송수신이 일어날 물리적 pin(TC23A: P14.0, 14.1, TC27D: P32.2, 15.7)을 고르고,
- Data 전송 속도를 정한 뒤, (AURIX와 통신을 진행하는 기기와 동일하게 맞춤)
- 통신관련 Interrupt 설정
void AsclinAscDemo_init(void)
{
    //...
    // create module config
    #if BOARD == APPLICATION_KIT_TC237
        IfxAsclin_Asc_initModuleConfig(&ascConfig, &MODULE_ASCLIN0);
    #elif BOARD == SHIELD_BUDDY
        IfxAsclin_Asc_initModuleConfig(&ascConfig, &MODULE_ASCLIN3);
    #endif

    // set the desired baudrate
    ascConfig.baudrate.prescaler    = 1;
    ascConfig.baudrate.baudrate     = 115200;
    ascConfig.baudrate.oversampling = IfxAsclin_OversamplingFactor_4;

    // ISR priorities and interrupt target
    #if BOARD == APPLICATION_KIT_TC237
        /* ISR priorities and interrupt target */
        ascConfig.interrupt.txPriority    = ISR_PRIORITY_ASC_0_TX;
        ascConfig.interrupt.rxPriority    = ISR_PRIORITY_ASC_0_RX;
        ascConfig.interrupt.erPriority    = ISR_PRIORITY_ASC_0_EX;
    #elif BOARD == SHIELD_BUDDY
        ascConfig.interrupt.txPriority    = ISR_PRIORITY_ASC_3_TX;
        ascConfig.interrupt.rxPriority    = ISR_PRIORITY_ASC_3_RX;
        ascConfig.interrupt.erPriority    = ISR_PRIORITY_ASC_3_EX;
    #endif
    ascConfig.interrupt.typeOfService = (IfxSrc_Tos)IfxCpu_getCoreIndex();

    // FIFO configuration
    ascConfig.txBuffer     = g_AsclinAsc.ascBuffer.tx;
    ascConfig.txBufferSize = ASC_TX_BUFFER_SIZE;

    ascConfig.rxBuffer     = g_AsclinAsc.ascBuffer.rx;
    ascConfig.rxBufferSize = ASC_RX_BUFFER_SIZE;

    // pin configuration
#if BOARD == APPLICATION_KIT_TC237
    const IfxAsclin_Asc_Pins pins = {
        NULL_PTR,                     IfxPort_InputMode_pullUp,        /* CTS pin not used */
        &IfxAsclin0_RXA_P14_1_IN, IfxPort_InputMode_pullUp,        /* Rx pin */
        NULL_PTR,                     IfxPort_OutputMode_pushPull,     /* RTS pin not used */
        &IfxAsclin0_TX_P14_0_OUT, IfxPort_OutputMode_pushPull,     /* Tx pin */
        IfxPort_PadDriver_cmosAutomotiveSpeed1
    };
#elif BOARD == SHIELD_BUDDY
    const IfxAsclin_Asc_Pins pins = {
        NULL_PTR,                     IfxPort_InputMode_pullUp,        /* CTS pin not used */
        &IfxAsclin3_RXD_P32_2_IN, IfxPort_InputMode_pullUp,        /* Rx pin */
        NULL_PTR,                     IfxPort_OutputMode_pushPull,     /* RTS pin not used */
        &IfxAsclin3_TX_P15_7_OUT, IfxPort_OutputMode_pushPull,     /* Tx pin */
        IfxPort_PadDriver_cmosAutomotiveSpeed1
    };
#endif
    ascConfig.pins = &pins;

    // initialize module
    IfxAsclin_Asc_initModule(&g_AsclinAsc.drivers.asc0, &ascConfig);
    // ...
}
Interrupt Configuration
- 통신 간 데이터 송수신을 위한 인터럽트를 등록한다.
// in ConfigurationIsr.h
#define ISR_PRIORITY_ASC_0_RX 4
#define ISR_PRIORITY_ASC_0_TX 5
#define ISR_PRIORITY_ASC_0_EX 6

#define ISR_PROVIDER_ASC_0    IfxSrc_Tos_cpu0

#define INTERRUPT_ASC_0_RX    ISR_ASSIGN(ISR_PRIORITY_ASC_0_RX, ISR_PROVIDER_ASC_0)
#define INTERRUPT_ASC_0_TX    ISR_ASSIGN(ISR_PRIORITY_ASC_0_TX, ISR_PROVIDER_ASC_0)
#define INTERRUPT_ASC_0_EX    ISR_ASSIGN(ISR_PRIORITY_ASC_0_EX, ISR_PROVIDER_ASC_0)

// in AsclinAscDemo.c
IFX_INTERRUPT(asclin0TxISR, 0, ISR_PRIORITY_ASC_0_TX)
{
    IfxAsclin_Asc_isrTransmit(&g_AsclinAsc.drivers.asc0);
}

IFX_INTERRUPT(asclin0RxISR, 0, ISR_PRIORITY_ASC_0_RX)
{
    IfxAsclin_Asc_isrReceive(&g_AsclinAsc.drivers.asc0);
}

IFX_INTERRUPT(asclin0ErISR, 0, ISR_PRIORITY_ASC_0_EX)
{
    IfxAsclin_Asc_isrError(&g_AsclinAsc.drivers.asc0);
}
Module Behavior
- 통신 검증을 위한 test function 구성
IfxAsclin_Asc_write을 통한 데이터 송신IfxAsclin_Asc_read을 통한 데이터 수신- 입출력 데이터를 비교하여 메세지 출력
// in AsclinAscDemo.c
void AsclinAscDemo_run(void)
{
    uint32 i, errors = 0;
    g_AsclinAsc.count = 5;

    for (i = 0; i < g_AsclinAsc.count; ++i)
    {
        g_AsclinAsc.txData[i] = i + '1';    // {'1', '2', '3' ,'4' ,'5'}
        g_AsclinAsc.rxData[i] = 0;
    }

    IfxAsclin_Asc_write(&g_AsclinAsc.drivers.asc0, g_AsclinAsc.txData, &g_AsclinAsc.count, TIME_INFINITE);
    IfxAsclin_Asc_read(&g_AsclinAsc.drivers.asc0, g_AsclinAsc.rxData, &g_AsclinAsc.count, TIME_INFINITE);

    // check received data
    for (i = 0; i < 5; ++i)
    {
        if (g_AsclinAsc.rxData[i] != g_AsclinAsc.txData[i])
        {
            ++errors;
        }
    }

    if (errors)
    {
        IfxAsclin_Asc_write(&g_AsclinAsc.drivers.asc0, g_AsclinAsc.rxData, &g_AsclinAsc.count , TIME_INFINITE);
        printf("ERROR: received data doesn't match with expected data (%lu mismatches)\n", errors);
    }
    else
    {
        IfxAsclin_Asc_write(&g_AsclinAsc.drivers.asc0, g_AsclinAsc.rxData, &g_AsclinAsc.count , TIME_INFINITE);
        printf("OK: received data matches with expected data\n");
    }

    //...
}
추가적인 설명
Terminal을 통한 송수신 확인
- Teraterm을 실행하여 board가 연결된 port와 connect
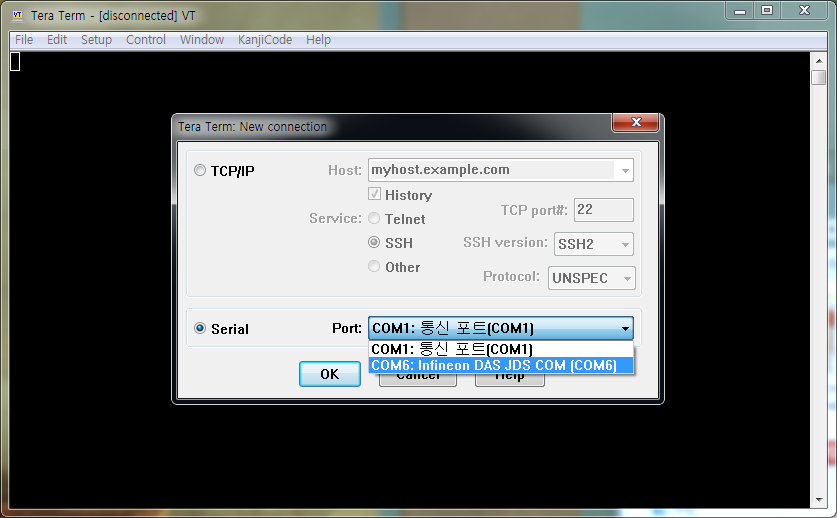
- Serial 통신을 위한 설정이 필요 (Setup > Serial port)
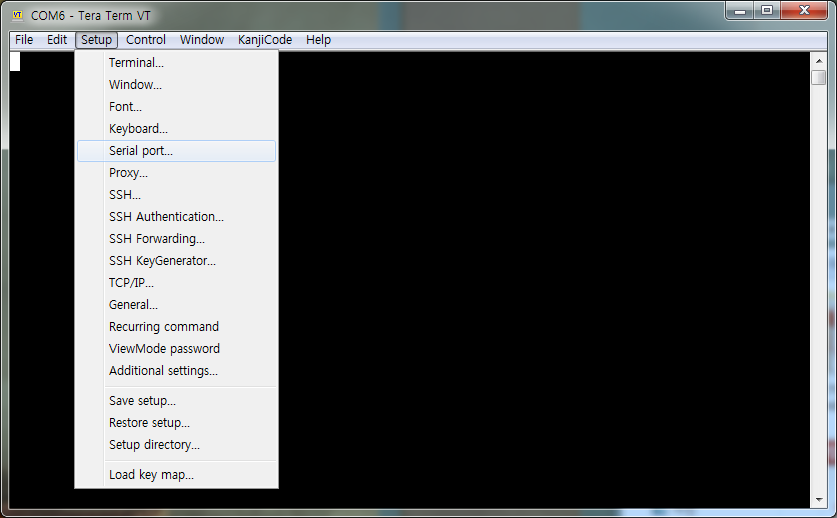
- Board에서 설정한 통신 스펙과 맞춰준다. (baud rate만 바꾸면 됨)
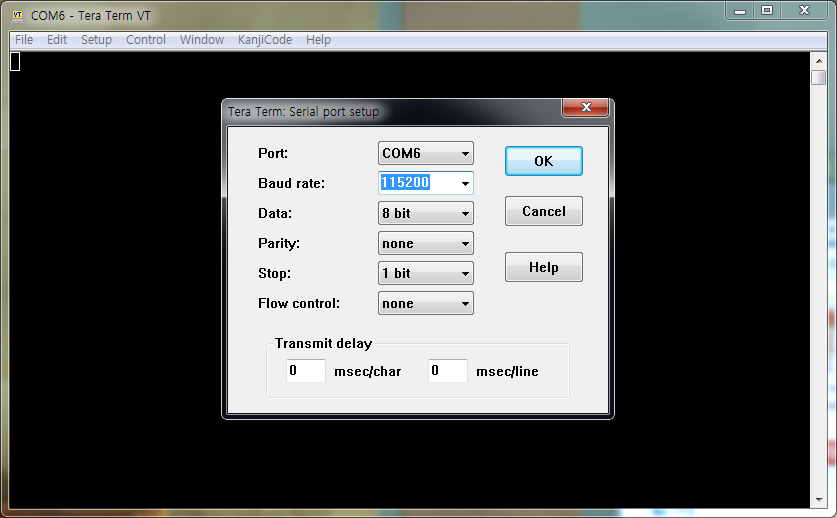
IfxAsclin_Asc_write로 보낸 데이터가 출력되는 것을 확인할 수 있다.

Simulated I/O를 통한 메세지 확인
- 만약 board와 디버거가 연결되어 실행되고 있다면,

- 설정해둔
printf()메세지가 출력되는 것을 확인할 수 있다.
